
A four wheel beach wheelchair seating inspection should follow support from fabric through attachments, backrest controls and leg-support connections. For AY-ST-V2.0, a clean-looking seat alone cannot establish readiness. Inspect the empty chair, resolve damaged connections, then complete your separate user handover procedure.
This checklist addresses physical equipment condition for resort and rental teams. Current AY-ST-V2.0 instructions identify a high backrest, adjustable back support and adjustable leg support. Personal positioning needs an appropriate individual assessment. Keep the current file from our wheelchair manual hub beside each inspection station.
Images are AI-generated illustrations based on product references. They do not document an actual inspection, factory visit, or project.
1. Which seating assembly belongs on this chair?
Begin with AY-ST-V2.0 identification and a full view of its fitted seating. A fleet may contain several blue chairs with different support assemblies. Compare component shape and attachment location, then check any replacement-part history. Upholstery color cannot establish compatibility.
The AY-ST-V2.0 all-terrain wheelchair page helps orient staff before they consult supplied instructions. Keep a local reference photograph of your accepted configuration. Show both sides because adjustment hardware can be obscured from one viewpoint.
- Confirm asset identity against its service record.
- Compare backrest, upper support and leg-support assemblies.
- Note added cushions or other accessories separately.
Match every support with its actual mounting point. A detached part beside a chair may belong elsewhere. Avoid installing it merely because holes appear aligned. Ask your supplier about uncertain assemblies.
Create a seating component map before inspecting a mixed fleet. Mark each removable assembly with a compatible asset group.
Seating identity map
| Assembly | Identification detail | Useful reference view |
|---|---|---|
| Seat fabric | Shape and attachment pattern | Empty seat from above |
| High backrest | Support uprights and connections | Rear and side |
| Upper support | Fitted mounting arrangement | Both attachment points |
| Leg support | Support panel and side fittings | Front underside |
2. How should staff inspect seat fabric and stitching?
Examine clean, dry seating under good light. Follow seams around their full perimeter and look beneath folds where abrasion can hide. Check both fabric surfaces without pulling apart sound stitching. Sand caught along a seam can obscure a tear or damaged attachment.
Observe whether fabric sits as intended across its supports. An uneven surface may reflect misassembly, stretched material or an attachment fault. Record what you see before deciding which part needs replacement. A photograph of sagging fabric alone rarely identifies its cause.
- Look for holes, cuts and separated stitching.
- Check attachment sleeves, tabs or other fitted interfaces.
- Inspect contact areas for embedded grit or sharp debris.
Trace a tear back toward its attachment. Damage near a supporting connection deserves separate attention from a superficial mark. Do not cover it with a cushion and return that chair.
Use the beach wheelchair range when identifying another fleet model, then consult its own parts file. Tag suspect upholstery and capture close and wider views.
Fabric findings and follow-up
| Observation | Next inspection | Release consequence |
|---|---|---|
| Loose surface sand | Clean using approved method | Recheck exposed fabric |
| Open seam | Inspect full seam and attachment | Hold seating assembly |
| Uneven seat surface | Compare mounting on both sides | Resolve cause before use |
| Stain without visible damage | Apply local hygiene procedure | Assess after cleaning |
3. What needs checking around the high backrest?
Inspect backrest fabric, supporting uprights and connection points as one assembly. AY-ST-V2.0 includes upper support above its main backrest in the supplied illustration. Check that fitted parts match your configuration and sit correctly in their intended mounts.
Look for asymmetric positioning from behind. One side may appear normal while another connection remains incomplete. Follow manufacturer instructions for each removable component. A visual comparison cannot replace prescribed engagement checks.
- Examine fabric around corners and mounting areas.
- Check both upper-support interfaces where fitted.
- Look for cracked, bent or displaced supporting parts.
Check both sides before judging alignment. A straight-looking fabric panel can conceal an incorrectly seated support. Photograph the rear assembly while empty, with adjustment controls visible.
For a programme using several support designs, our equipment applications can help frame service requirements. They do not establish individual head-support suitability. Ask an appropriate assessor about a user’s needs and keep that decision separate from maintenance findings.
Backrest inspection positions
| Viewing position | Inspect | Record when abnormal |
|---|---|---|
| Rear centre | Symmetry and fabric attachment | Side showing displacement |
| Left side | Upright and fitted connection | Close photograph |
| Right side | Matching connection and clearance | Difference from accepted setup |
| Upper support | Mounting and material condition | Exact component identity |
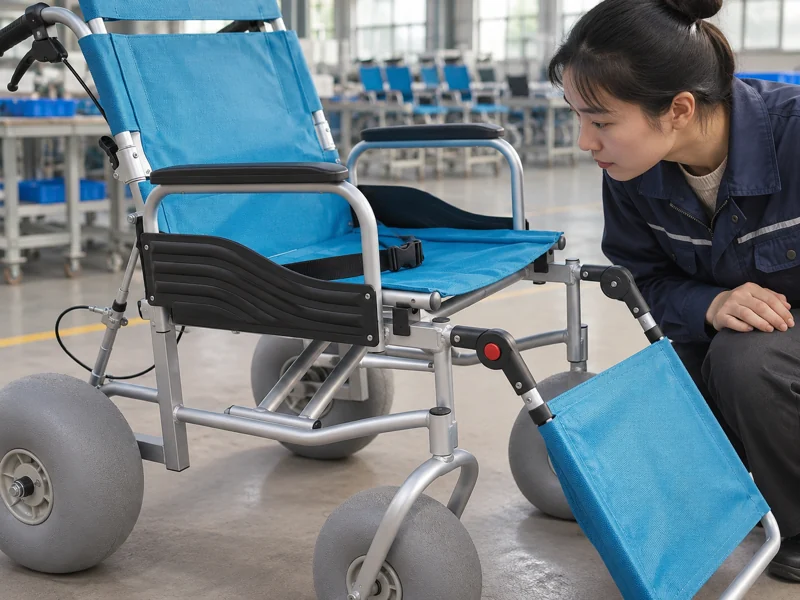
4. How should backrest adjustment controls be reviewed?
Review adjustment with an empty chair on a suitable firm, level inspection area. Use the current manual for control operation and permitted positions. The V2.0 illustration shows controls associated with backrest movement; it does not provide a complete diagnostic repair procedure.
Watch movement and engagement during an ordinary operating cycle. Identify hesitation, unequal movement or failure to hold an instructed position. Stop when a control behaves unexpectedly. Additional force may obscure a fault or worsen damage.
- Check accessible control components for visible damage.
- Observe routing and clearance of fitted cables.
- Confirm intended engagement using supplied instructions.
Record the position where behavior changes. “Backrest faulty” gives a technician little information. A useful note identifies control position, observed movement and whether symptoms repeat during permitted checks.
Remove a suspect unit from service and send observations through Ary Beach technical enquiries. Request model-specific diagnostic guidance before adjustment or repair.
Adjustment observations
| Observation | Detail worth recording | Technician question |
|---|---|---|
| Control feels obstructed | Position and visible obstruction | What inspection method applies? |
| Unequal side movement | Which side and when | Which connection needs examination? |
| Position fails to hold | Selected position and behavior | Which locking component applies? |
| Cable appears displaced | Routing photograph | What approved routing applies? |
5. What should operators examine on leg support?
Follow the leg-support assembly from its contact surface toward both mounting points. Check fabric or panel condition, surrounding edges and every fitted connector. V2.0 documentation shows a removable support assembly and adjustable support positions. Consult instructions for your delivered version when reviewing either function.
Keep the assembly supported as directed during any authorised adjustment. Do not stand on a support or improvise a proof-load test. A service inspection should not introduce forces outside intended operation.
- Inspect contact surfaces and their attachments.
- Check matching engagement at both mounting sides.
- Observe clearance through approved adjustment positions.
Inspect each connection before changing position. A damaged mount cannot be corrected by choosing another angle. Document wear, distortion or missing retention separately from comfort observations.
A route changing from firm access onto sand may require a broader review of beach access surfaces. Seating inspection remains a separate release requirement. Identify uncertain components before requesting replacements.
Leg-support inspection map
| Area | Inspect for | Record |
|---|---|---|
| Support surface | Tears, sharp debris or damaged edges | Location and close view |
| Left mounting point | Complete intended engagement | Fitted hardware |
| Right mounting point | Matching engagement and condition | Any asymmetry |
| Adjustment interface | Damage or obstructed operation | Affected position |
6. Which attachments need review after removal?
Use a location-based check after components have been removed for transport, cleaning or repair. Walk around the chair in a consistent direction and compare seating attachments with their references. This prevents a loose part from disappearing within a general “assembly checked” entry.
Check visible retention hardware without inventing tightening values. Fastener appearance cannot tell staff what torque or replacement grade applies. Where instructions leave a connection unclear, request clarification before tightening or substituting hardware.
- Identify each part that was removed.
- Confirm its return location and prescribed engagement.
- Account for unused pieces after assembly.
An unexplained spare part keeps reassembly open. It may be packaging hardware, but staff need an answer before a user sits down. Photograph its size and shape beside a reference scale.
Fleets comparing handling arrangements will find that lightweight wheelchair configurations have different assembly boundaries. Keep those model-specific instructions stored separately. Complete a component check immediately after reassembly while removal details remain fresh.
Reassembly record
| Removed item | Reassembly check | Record owner |
|---|---|---|
| Upper support | Correct mounts and engagement | Person installing |
| Leg support | Matching side connections | Person installing |
| Seating component | Correct attachment pattern | Service technician |
| Associated hardware | Correct location; no unexplained remainder | Final inspector |
7. How does inspection differ from user handover?
Condition inspection asks whether equipment matches its intended configuration and works as instructed. User handover asks whether that configuration suits a particular person and their planned use. A maintenance tick cannot answer both questions.
Keep personal information out of general workshop photographs. Staff may record that an individual assessment was completed without copying clinical details into an asset log. Discuss consent, assistance and positioning through your established service procedure.
- Separate equipment release from individual suitability.
- Confirm who may make each decision.
- Escalate discomfort or unsupported positioning needs.
A mechanically sound chair still needs a suitable handover. Do not use its adjustable backrest as proof that every guest can use it. Added cushions or supports also need compatibility review.
When planning a service alongside other beach-access projects, define responsibilities before opening reservations. Give front-line staff a clear contact for suitability questions. Their role should never depend on guessing a medical answer during a busy booking.
Two separate decisions
| Decision | Main question | Responsible role |
|---|---|---|
| Equipment condition | Are parts sound and correctly fitted? | Trained equipment inspector |
| Individual suitability | Does this setup suit planned personal use? | Appropriate assessor or service lead |
| Assistance arrangements | Who performs agreed assistance? | Operating team |
| Reservation release | Are both decisions complete? | Booking or duty lead |
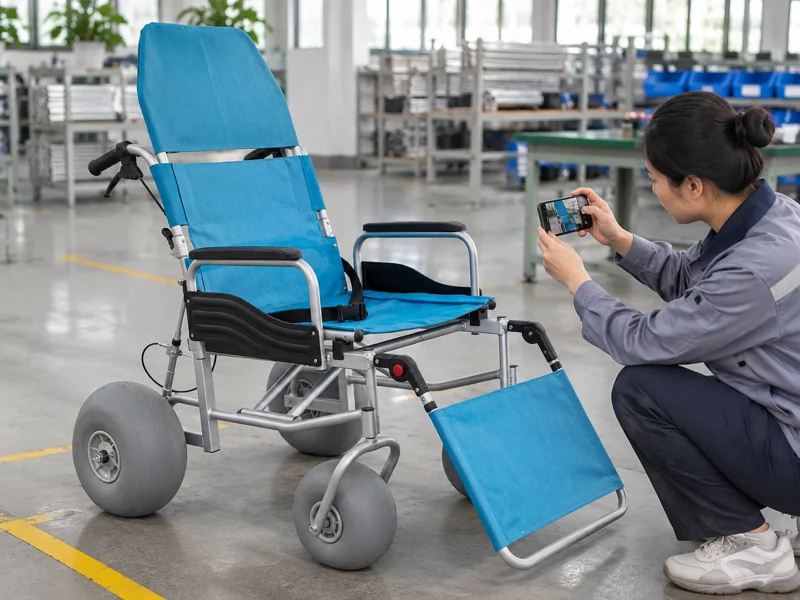
8. How should cleaning lead into another seating check?
Cleaning should expose surfaces for inspection and leave equipment ready for its next approved use. Follow current instructions for water, cleaning products and drying. The manual illustrates rinsing; that illustration does not specify every chemical, pressure or lubrication product.
Examine areas previously hidden by sand after cleaning. Pay particular attention to seams, support mounts and control interfaces. Keep upholstery accessible during drying rather than hiding damp surfaces under covers.
- Remove loose contamination using an approved method.
- Inspect newly exposed fabric and fittings.
- Confirm drying and hygiene requirements before handover.
Recheck the same defect location after cleaning. A dark line may disappear with dirt removal or reveal a split underneath. Save before-and-after photographs when condition remains uncertain.
Our supplier support overview provides a starting point for maintenance enquiries. Request instructions tied to your seating materials before changing products. Record persistent contamination for further assessment.
Post-cleaning review
| Area | Recheck | Escalate when |
|---|---|---|
| Fabric seam | Hidden damage and remaining debris | Separation remains visible |
| Support mount | Correct engagement after cleaning | Movement or damage remains |
| Adjustment interface | Clear access and ordinary function | Binding persists |
| Covered contact surface | Dryness and hygiene condition | Release requirements remain unmet |
9. Which seating faults should keep a chair unavailable?
Hold equipment when seating support, attachment or adjustment function remains uncertain. Distinguish that condition from a minor cosmetic observation your inspection procedure explicitly allows. Staff need a decision based on affected function, not appearance alone.
A hold record should name the assembly and explain what prevents use. That detail helps scheduling staff allocate another chair. It also prevents a repair on one component from closing unrelated findings.
- Record damage affecting support or retention.
- Separate each fault into its own repair item.
- Attach photographs without a seated user.
Resolve every fault that caused the hold. Replacing upholstery does not resolve a control that fails engagement. After repairs, repeat affected checks and inspect connections disturbed during work.
Attach a visible availability tag and remove that asset from booking choices. Give a service technician its defect record before requesting a completion date.
Seating hold decisions
| Finding | Immediate disposition | Release requirement |
|---|---|---|
| Torn support fabric | Unavailable | Approved replacement and fitting check |
| Missing attachment component | Unavailable | Correct part installed and checked |
| Backrest fails engagement | Unavailable | Technical resolution and functional recheck |
| Cosmetic mark only | Assess under local criteria | Recorded condition decision |
10. What should a seating release record contain?
Finish with a record another shift can use without repeating your investigation. Identify the chair, inspector, inspection date and manual reference. Record each corrective action beside its original finding, including replaced parts and final recheck.
Maintain a short handover note for operational staff. It should state availability and any authorised configuration restriction without reproducing workshop detail. A prior release does not replace later checks after transport, component removal or reported damage.
- Link repaired items with their original defect numbers.
- Record checks repeated after repair.
- Update physical tags and booking status together.
Release the seating configuration staff will actually issue. If an accessory changes afterward, review that change before handover. Store an empty-chair reference photograph with the completed record.
Start your next fleet review with one AY-ST-V2.0 asset. Build its seating map, inspect each support and connection, then use that exact configuration for staff practice.
Q1: Can a cushion cover a small seat tear?
No. Assess damaged seating and its support function before reuse. A cushion does not repair fabric or attachments.
Q2: Should staff adjust a stiff backrest repeatedly?
Stop when ordinary instructed operation reveals binding. Record where it occurs and obtain model-specific service guidance.
Q3: Can another blue head support fit AY-ST-V2.0?
Color alone cannot establish part compatibility. Confirm mounting arrangement and approved part identity for your delivered chair.
Q4: Does passing this check confirm a user’s posture?
No. Physical condition and individual positioning require separate decisions by appropriate people.
Q5: When should seating be checked again after release?
Follow your current maintenance schedule and pre-use procedure. Recheck affected assemblies after removal, repair, transport-related disturbance or a reported fault.