
PVC beach wheelchair assembly becomes easier to audit when every frame section, connector, wheel, fabric panel, fastener, and check has a clear identity. A knocked-down shipment also needs matching labels, instructions, and an approved fitting sequence.
Next, link packing, part count, assembly order, inspection photos, training, and acceptance status. This guide structures PVC beach wheelchair assembly without inventing torque values, load figures, or certifications. Supplier instructions and approved drawings remain the authority.
What should arrive with a PVC beach wheelchair kit?
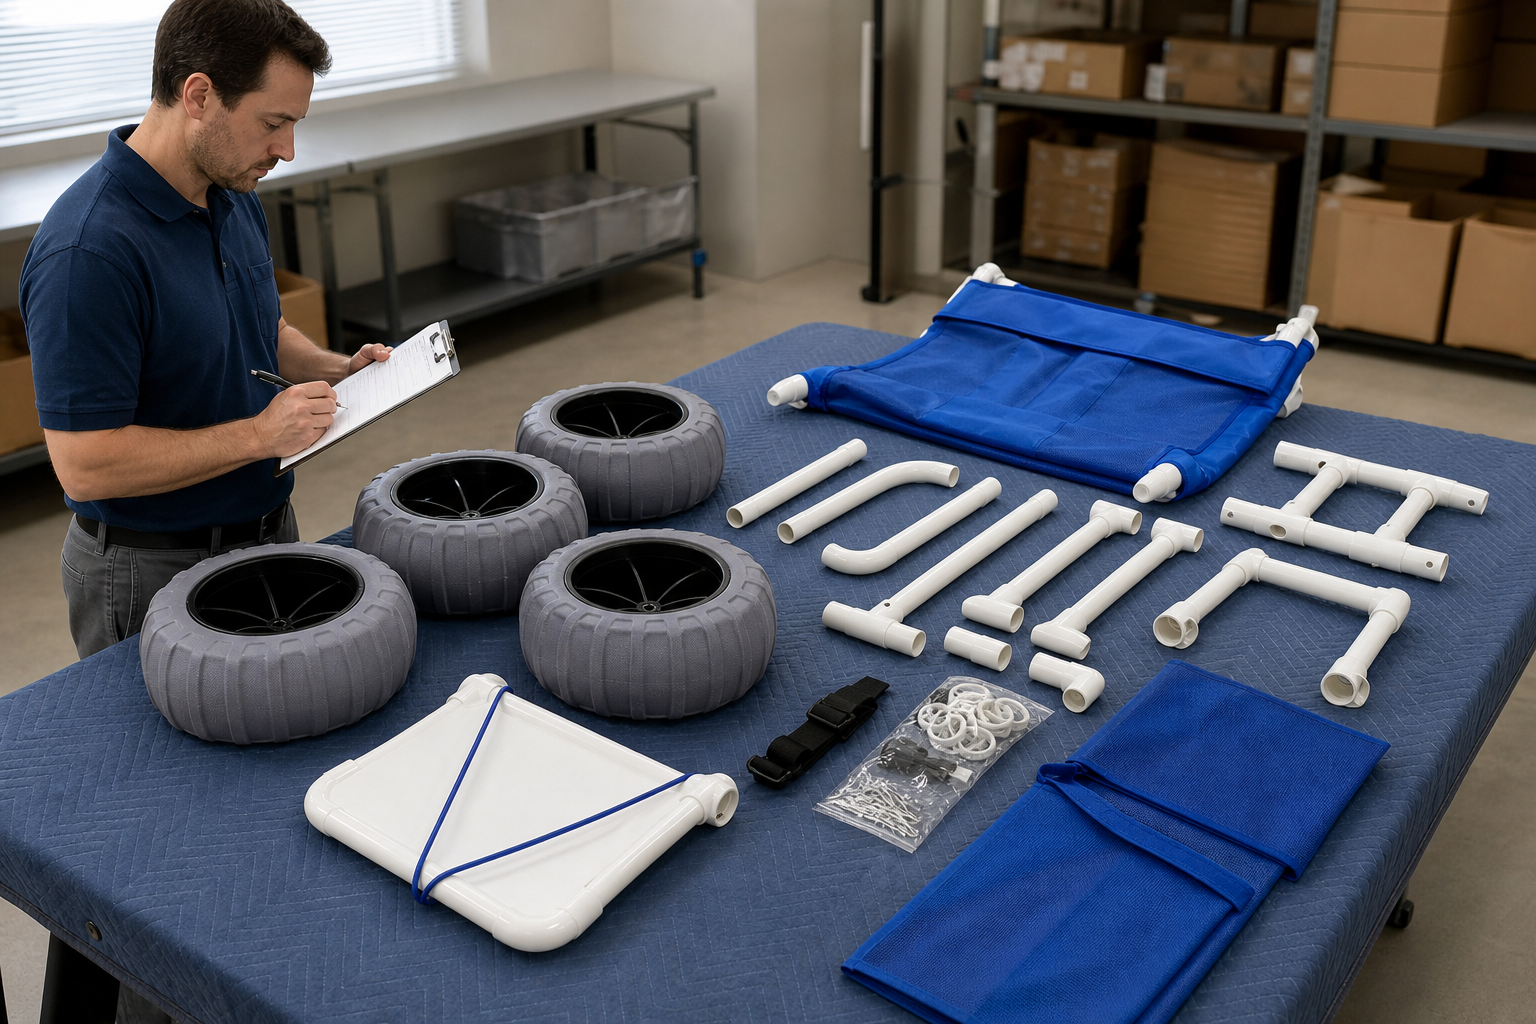
Next, PVC beach wheelchair assembly should begin with a controlled kit containing identified frame sections, connectors, wheels, seat fabric, foot support, hardware, instructions, and order-specific records. For example, the National Park Service mobility-device list shows why operating context should remain separate from assembly evidence.
How can receiving staff control every component?
Begin before opening every bag: photograph carton labels and compare them with the packing list. Open one planned kit in a clean, dry area where small hardware cannot disappear. Place parts on a protected surface in the same order as the supplied diagram. Do not force a connector or substitute a locally available fastener when identity remains unclear. Mark shortages, damage, moisture, or mismatched colors as hold conditions. The user manual page can help buyers frame documentation questions, while the supplied model-specific instructions control the actual work.
- Record carton, order, model, and kit identifiers.
- Photograph sealed hardware bags before opening them.
- Count parts against a revision-controlled packing list.
- Isolate damaged or unidentified components from accepted stock.
Key Takeaway: Kit control protects traceability before assembly changes the original packing condition.
| Receiving point | Record | Status |
|---|---|---|
| Carton identity | Label photo | Match or hold |
| Part count | Packing-list check | Complete or shortage |
| Visible condition | Photo and note | Pass or damage |
Then, Review every hold item before staff begin fitting parts from another kit.
How should buyers verify the parts list?
Then, PVC beach wheelchair assembly parts should be verified through a model-specific illustrated list showing quantity, location, orientation, and compatible revision. Then use the supplier overview to prepare questions, while the exact packing list controls acceptance.
What makes an illustrated list easy to use?
A name needs a picture and position: terms such as side rail, cross member, elbow, hub, axle, seat panel, strap, or foot support can mean different pieces across revisions. Use an illustration that matches the quoted model and mark mirrored parts clearly. Add supplier part references where replacement ordering matters. If a connector looks similar but serves another location, the list should prevent accidental exchange. Staff may place temporary removable tags on parts during training, provided those tags do not damage surfaces or remain on the finished unit.
- Pair every part name with a clear image or drawing callout.
- Show quantity and left, right, front, or rear orientation.
- Record the model revision on the parts list.
- Link replaceable parts with supplier ordering references.
Key Takeaway: An illustrated parts list reduces guesswork and supports later maintenance conversations.
| Part-list field | Purpose | Check |
|---|---|---|
| Image or callout | Visual identity | Match actual part |
| Quantity | Kit completeness | Count before work |
| Revision | Compatibility | Match supplied model |
Meanwhile, Treat a missing orientation mark as a documentation question before fitting mirrored parts.
What should assembly instructions show?
Meanwhile, PVC beach wheelchair assembly instructions should show the approved sequence, component orientation, hand placement, permitted tools, connection checks, and stop conditions.
How can instructions reduce improvised work?
Each step should answer three questions: what part moves, where it goes, and how staff know the connection is complete. Clear photos can show connector depth, alignment, fastener order, fabric orientation, wheel seating, and foot-support position. Instructions should identify steps that need two people or a support stand. They should also say when work must stop for a damaged part, unclear fit, or missing fastener. Buyers should request a current revision before production and place that same revision inside each kit or approved digital file.
- Use one action per numbered instruction step.
- Show the completed connection beside the loose components.
- Name supplier-approved tools without adding substitutes.
- Add a visible stop note for damage, mismatch, or abnormal resistance.
Key Takeaway: Good instructions replace memory with observable connection checks and clear stop points.
| Instruction element | Example record | Audit use |
|---|---|---|
| Step action | Fit named rail | Sequence check |
| Completion cue | Alignment photo | Connection review |
| Stop condition | Damage or poor fit | Hold decision |
For example, Read the full sequence before assembly so later parts do not block an earlier check.
How can teams prepare a clean assembly area?
For example, PVC beach wheelchair assembly needs a clean, dry, well-lit area with protected flooring, controlled parts, safe lifting space, and access to the approved instructions. An accessible beach mat belongs outside the assembly record and should have its own site plan.
What setup keeps parts and records together?
Treat the workspace as part of quality control: separate unopened kits, active work, held parts, and completed units. Use trays for hardware and a clean pad for fabric. Keep sand, salt, water, and public traffic away from the assembly zone. Place the parts list and inspection form where staff can mark steps without touching a phone or paper with dirty hands. If more than one kit is open, use clear kit identifiers so parts do not cross between cartons.
- Assign zones for unopened, active, held, and accepted items.
- Use small trays labeled with the current kit identifier.
- Protect fabric, tubing, hubs, and wheels from floor damage.
- Keep the current instructions visible throughout the workflow.
Key Takeaway: A controlled work area prevents mixed parts, hidden damage, and incomplete inspection records.
| Work zone | Allowed items | Control |
|---|---|---|
| Active build | One identified kit | Part traceability |
| Hold area | Questioned components | No accidental use |
| Accepted area | Checked unit and record | Ready for next review |
However, Inspect the workspace layout before opening another kit.
How should the assembly sequence be recorded?
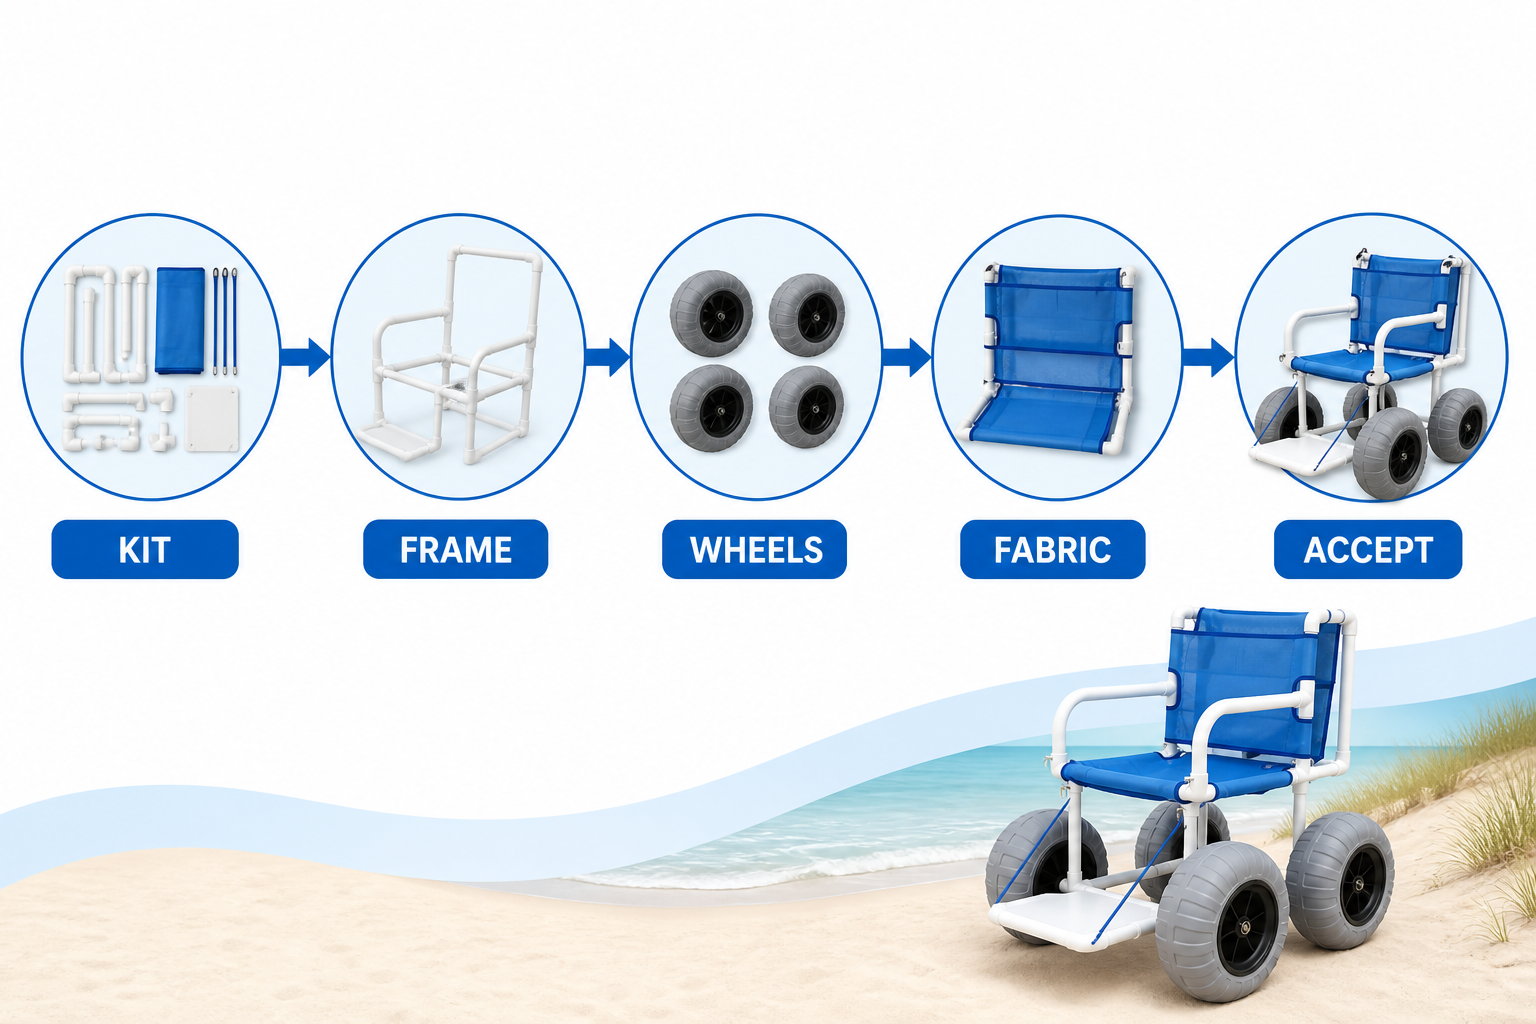
However, PVC beach wheelchair assembly should be recorded as a short stage flow covering kit verification, frame fitting, wheel installation, fabric and support fitting, inspection, and acceptance.
What stage record supports a repeatable build?
Use stages instead of a long free-form note: assign a checkbox, reviewer, date, and photo reference to each stage. The record should not replace supplier instructions; it shows that staff used them. Add a field for holds and clarification responses. When a supplier approves a correction, attach that response to the same kit record. Buyers can also compare this process with broader project planning examples while keeping local acceptance rules specific to the purchased model.
- Verify kit identity and document revision before fitting.
- Record frame connections before wheels hide inspection points.
- Photograph completed wheel and fabric stages.
- Close the record only after every hold has an outcome.
Key Takeaway: A stage record creates a compact audit trail without rewriting the product manual.
| Stage | Evidence | Completion rule |
|---|---|---|
| Kit check | Part count and photos | No open shortage |
| Frame and wheels | Connection photos | Match instructions |
| Final inspection | Signed checklist | Holds closed |
As a result, Follow the stage with the weakest evidence before accepting the unit.
What should teams check at frame connections?
As a result, PVC beach wheelchair assembly frame checks should confirm correct part identity, orientation, seating, alignment, approved fasteners, and absence of visible damage.
How can staff inspect connections without inventing limits?
Use supplier-defined cues: staff may check a reference mark, flush fit, pin position, fastener sequence, or photo match when those cues appear in approved instructions. Do not create torque values, insertion depths, or load tests without authorized product documentation. Inspect tubing and connectors for cracks, distortion, sharp damage, trapped fabric, or contamination. Photograph connections before later parts block the view. Another reviewer can compare the finished frame with the approved sample or drawing.
- Match each connector with its documented location.
- Confirm orientation before applying permitted fasteners.
- Stop when fit requires force outside written instructions.
- Photograph hidden joints before installing covering parts.
Key Takeaway: Connection inspection relies on model-specific cues and documented stop conditions, not workshop improvisation.
| Connection check | Evidence source | Staff result |
|---|---|---|
| Part identity | Illustrated list | Match or hold |
| Seating cue | Approved instruction | Pass or query |
| Visible condition | Direct inspection | Pass or damage |
Afterward, Give extra review to connections hidden after fabric or wheels are fitted.
How should wheels and foot support be verified?
Afterward, PVC beach wheelchair assembly wheel and foot-support checks should verify model identity, side or position, secure seating, free empty rotation, documented retention, and correct support attachment. Also compare an all-terrain model only through its own drawings and instructions.
What observations belong in the final record?
Check one component at a time: compare wheel or hub markings with the parts list, follow the approved mounting sequence, and confirm the stated retention cue. Rotate the empty wheel only as the instructions allow, listening and watching for contact, binding, or visible misalignment. Fit the foot support in its approved orientation and check attachment points, straps, or braces against the diagram. Do not place a user in the chair during an incomplete assembly check.
- Confirm wheel location and any front or rear difference.
- Record the retention method shown in the manual.
- Observe empty rotation and clearance without added load.
- Verify foot-support orientation and attachment points.
Key Takeaway: Wheel and foot-support checks should follow documented identity, fit, and retention cues before any service use.
| Component | Check | Record |
|---|---|---|
| Wheel | Identity and seating | Photo and status |
| Retention | Approved cue | Pass or hold |
| Foot support | Orientation and attachment | Photo and status |
Also, Review left and right results together to catch mismatched installation.
How should fabric and user-contact areas be checked?
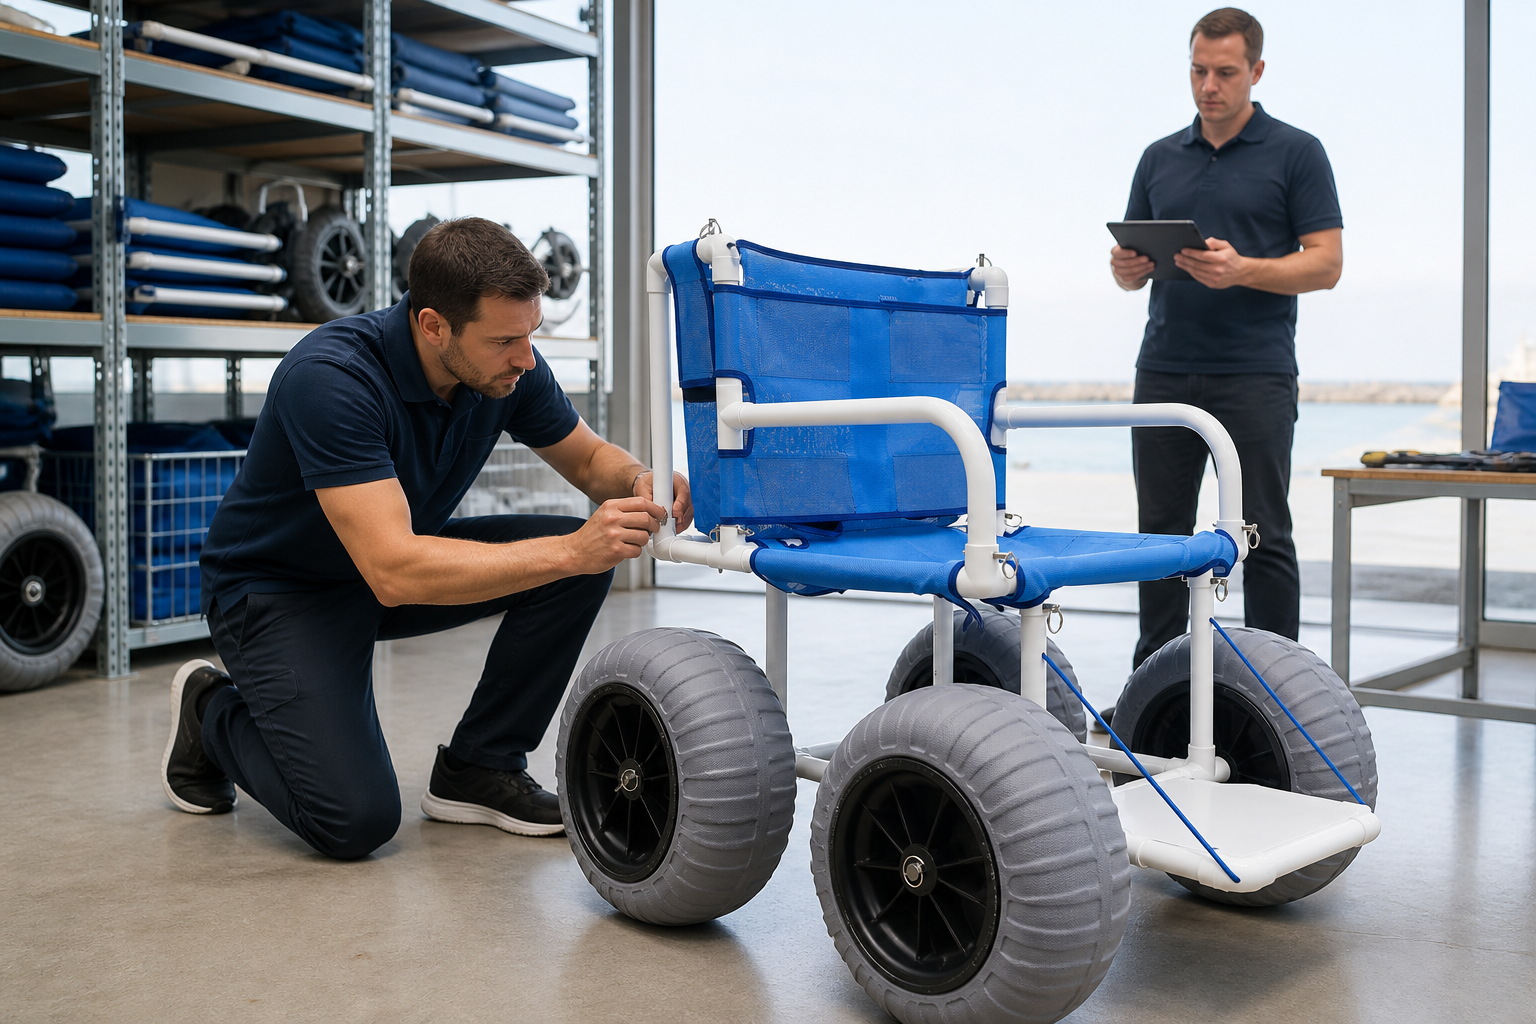
Also, PVC beach wheelchair assembly fabric and contact-area checks should confirm correct orientation, attachment, tension method, strap routing, smooth surfaces, and clear access around the seated area.
What can visual inspection catch before use?
Look from the user’s position and the attendant’s position: check seat and back panels for twists, missed loops, uneven routing, trapped material, loose ends, and contact with moving parts. Review arm areas, handles, frame edges, strap hardware, and foot support for visible defects or unexpected protrusions. Compare fabric color and panel shape with the approved configuration. The wider beach wheelchair category can help buyers separate models, yet the purchased kit record must control the check.
- Match seat and back orientation with the supplied diagram.
- Trace every strap, loop, buckle, and attachment point.
- Inspect hand, arm, leg, and foot contact areas visually.
- Keep fabric clear of joints, hubs, and moving components.
Key Takeaway: Contact-area review catches routing and finish issues before they become operating questions.
| Inspection area | Visual cue | Result |
|---|---|---|
| Seat and back | Correct orientation | Pass or refit |
| Straps and loops | Complete routing | Pass or query |
| Frame contact | Smooth and clear | Pass or hold |
Then, Inspect the assembled chair from several heights rather than relying on one front photo.
How can teams train and audit repeated assembly?
Then, PVC beach wheelchair assembly training should use the approved instructions, a supervised demonstration, an independent repeat, and a signed record for each authorized staff member.
What shows that a workflow can be repeated?
Another build tells the truth: after watching a demonstration, staff should assemble another identified kit without step-by-step coaching. A reviewer notes skipped checks, part confusion, tool questions, and record gaps. Training should cover disassembly or wheel removal only when the supplier permits it. Add cleaning, drying, storage, and hold-tag steps so the finished unit moves into service through a controlled path. Update training when the model revision or instructions change.
- Use the same checklist for demonstration and independent repeat.
- Record questions without correcting the record after the fact.
- Confirm who may accept, hold, or report a unit.
- Archive superseded instructions away from active work.
Key Takeaway: Independent repetition shows whether instructions and records support real staff work.
| Training stage | Reviewer looks for | Outcome |
|---|---|---|
| Demonstration | Correct sequence | Questions logged |
| Independent repeat | Unprompted completion | Pass or retrain |
| Revision update | Changed steps | Refresher recorded |
Next, Study repeated errors as documentation or process gaps before blaming individual staff.
What do buyers ask before accepting assembled units?
Next, PVC beach wheelchair assembly buyers usually ask about part identity, instruction revision, connection evidence, wheel fit, fabric routing, training, and the response to a held unit.
Which assembly FAQs should be settled before service use?
Keep each answer tied to a document or observation: that approach prevents informal fixes from becoming routine.
- Confirm the exact kit and instruction revision.
- Save photos for connections later hidden from view.
- Record every hold, supplier response, and recheck.
- Keep accepted units separate from incomplete work.
Can I replace a missing connector with a similar local part? No. Hold the kit and request the identified compatible part from the supplier unless authorized product documentation states another approved option.
What’s the best way to avoid mixing parts between kits? Open one kit in a named work zone, label trays with its identifier, and close every shortage before borrowing anything from another carton.
How do I know if a connection is fully seated? Use the cue in current model instructions, such as alignment, pin position, reference mark, or approved photo. Do not invent a measurement.
Can staff use the chair right after the last part is fitted? No. Complete the documented inspection, close holds, assign acceptance status, and follow local service-release policy.
Key Takeaway: Acceptance comes after traceable parts, approved steps, recorded inspection, closed holds, and authorized release.
| Buyer question | Evidence | Pass signal |
|---|---|---|
| Are parts correct? | Illustrated list and count | Model match |
| Was assembly controlled? | Stage photos and checklist | No open hold |
| Can staff repeat it? | Independent training record | Authorized completion |
Review every unresolved item before release, then contact us today when your kit, drawing, and acceptance questions are ready for a supplier discussion.